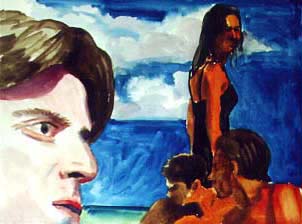
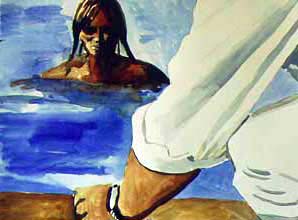
As shown by these two water colour paintings by Stephen
Abela (Toronto), a story can be told through a clever placement of
your image in various contexts / environments.
After creating a series of sketches (gesture, responsive line drawing,
and careful observational drawings) or your face and other body parts,
you will have the tools to create such a work. |
THE PROJECT
Your Self Portrait in context will include:
- an aspect of yourself occupying 1/3 of the final image
- a background context drawn from other observed subjects or image(s)
- the imitation of two textures in your figure or background context
You Will Hand In:
- the self portrait drawing of yourself in a new environment
- four texture drawings from objects found in your environment.
|
Part A: Finding Textures
- Search your home or external environment for a variety of surface
textures (4 to 6).
- In your TERM 1 Notes section of your Art Journal, over two pages
create a total of 4 boxes, each 5"x5" (12cmx12cm). In
each box use your coloured pencils to imitate the colours and
texture of a different textured surface from your environment.
Each box should look quite different from each other. Neatly label
to identify what each drawn texture is.
Examples of textured subjects might include: dog food, dog
hair, dog nail clippings, dog slobber on a dish. |
|
Part B: Self Portrait
- Taking a photograph of yourself, working through a mirror, or drawing
your hands or feet, plan to take the body part you draw and place it
within a new context.
- This new context will include the two textures taken from your found
textures (from Part 1).
- Avoid working from your visual memory. Use other visual resources
to create an interesting context for subjects in your background. Example:
magazine images, photos, movie backgrounds, exotic places, etc.
- In essence, you will combine your self-portrait with two characteristics/elements
from your chosen textures to create a new image with a new meaning(s).
Example, use the texture of one of your objects as a piece of your
clothing (shirt made of dog hair), background (the texture of the dog
food) etc.
|
In your Process…
- Planning is important. Create 5 thumbnail sketches
to see several different ways to combine the image of yourself and
the new environment. See your ideas in 5 different principples of
design. Have fun seeing all the different meanings you can get by
simply placing yourself in different places around the environment.
Play with cropping, color, line, and other ways to variety your image.
You could mix styles together; perhaps place your likeness into that
of a painting from our art
history.
- Plan to have your likeness (body part) take up at least a
third (25%) of the overall finished image.
|
Click here
for the assessment template (.pdf file)
Suggested Materials:
- Coloured pencil or Watercolours.
- 10x13” sheet of Mayfair cardstock or watercolour paper.
|